
How to Paint Hand-Painted Micro Floral Nail Art with a Dotting Tool
Hand-painted floral nail art looks intricate and bespoke, yet miniature five-petal blossoms are actually one of the most beginner-friendly techniques in nail artistry. Instead of freehand sketching petals with a shaky brush, you use a simple round dotting stylus to stamp uniform micro-petals around an imaginary center, then connect delicate stems with a fine liner brush.
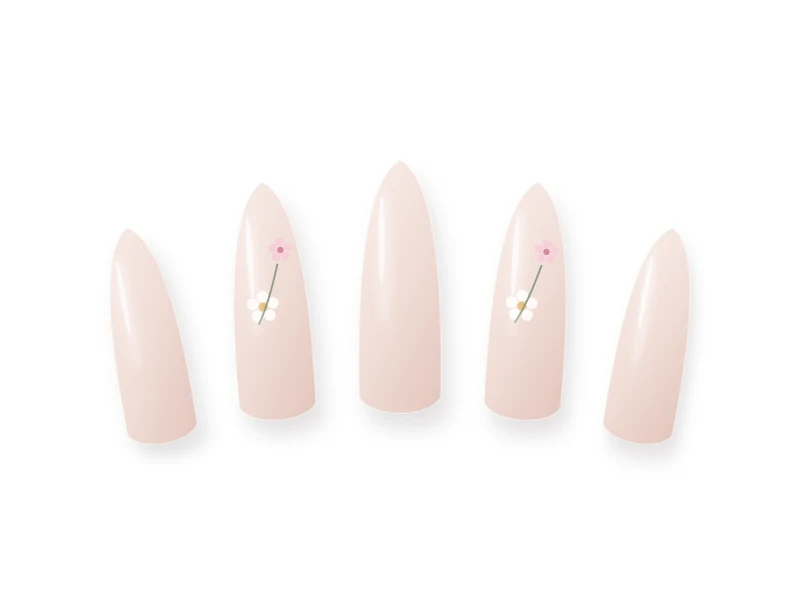
Overview of the Nail Design
This tutorial teaches proportional micro-floral scaling so flowers look refined and botanical rather than bulky, plus how to arrange clusters asymmetrically for modern editorial balance.
Generic Tools and Materials Needed
You only need standard, generic manicure tools to practice this technique cleanly:
- 180/240-grit file, wooden cuticle stick, lint-free wipes, and alcohol
- Base coat, sheer nude or soft milky-pink base shade, and glossy top coat
- Small dual-ended dotting tool (tiny 0.8mm and 1.2mm tips)
- 7mm fine detail liner brush
- Opaque ivory-white, muted rose, soft butter-yellow (center), and sage-green pigments
- Botanical cuticle oil
Nail Preparation
- Prep and dehydrate nails, apply base coat, and layer two thin coats of sheer neutral or milky blush so the delicate flowers stand out cleanly.
- Dispense tiny pea-sized drops of your floral shades onto a clean foil square or palette.
Step-by-Step Instructions
-
Step 1
Map Asymmetrical Floral Clusters
Rather than placing one large flower dead-center on every nail, arrange small clusters tucked gracefully along one corner—such as two tiny blossoms near the lower-left cuticle and a half-blossom peeking off the upper-right edge.
-
Step 2
Stamp Five Petals with a Fine Dotting Stylus
Dip the 1mm dotting tip lightly into ivory-white pigment. Touch gently onto the nail to place five evenly spaced micro-dots arranged in a tiny circle (imagine the five points of a star), leaving a pinhead of empty space in the middle.
-
Step 3
Optionally Pull Petals Slightly Inward
For softer teardrop petals instead of round daisies, wipe your finest 7mm liner tip clean and gently drag the inner edge of each wet dot 0.5mm toward the center point.
-
Step 4
Dot the Golden or Blush Center
Flash-cure the white petals for 10 seconds (or wait 2 minutes for regular polish), then dip the smallest dotting tip into soft butter-yellow or muted rose and tap one delicate center dot right into the middle of each blossom.
-
Step 5
Taper Whisper-Thin Botanical Leaves
Load just the tip of your 7mm detail brush with muted sage green. Press lightly near the base of a blossom and lift smoothly away as you pull outward—that press-and-lift motion naturally creates a graceful pointed leaf tip.
-
Step 6
Float Glossy Top Coat Without Smudging
Cure all gel art fully (or wait 5 full minutes for lacquer), then float a smooth bead of glossy top coat over the design so petals remain crisp and completely smooth to the touch.
Beginner-Friendly Tips
- Wipe your dotting tool on a lint-free pad every 3 to 4 dots so dried pigment never builds up and makes petals oversized.
- Mixing two flower sizes—one slightly larger blossom beside two tiny micro-buds—creates instant botanical realism.
Common Mistakes to Avoid
- Pressing the dotting tool down too hard, squashing petals together into one white blob.
- Making stems too thick—keep botanical foliage whisper-thin so flowers stay the focal point.
Troubleshooting & Professional Finishing
- Petals look bumpy in profile: Use higher-opacity pigment in smaller dots and finish with a slightly fuller self-leveling glossy top coat.
Finishing Technique
Clean detail brushes immediately in gentle cleaner or clear gel, reshape to a point, and massage cuticle oil around finished nails.
Alternative Design Variations
- Pressed-Petal Sheer Florals: Use translucent blush and lavender washes with a tiny gold foil flake in the center.
- Monochrome Ivory Lace Florals: Paint delicate white micro-blossoms over milky sheer nails for a romantic bridal accent.
Safety, Removal & Aftercare
Keep gel paint strictly on the nail surface and cure thoroughly. Remove regular polish or soak off gel gently without scraping.
Nail Care & Aftercare
Daily cuticle oil and protective gloves keep delicate hand-painted designs crisp and glossy.
Frequently Asked Questions
What if I don't own a dotting tool?
The rounded head of a clean sewing pin or the tip of a fine toothpick works well in a pinch for tiny micro-dots—just test the dot size on foil first.
Related Tutorials
How to Create Micro French Tips: Crisp Hairline Smile Lines at Home
Master razor-thin 1mm French smile lines using a fine liner brush, sheer blush base balancing, and clean-up refinement for an effortlessly elongated manicure.
How to Create Classic White French Tips with Balanced Proportions
Learn the exact geometry behind timeless classic white French tips—from choosing a flattering sheer base to carving deep, symmetrical smile lines.
How to Do Glazed Donut Nails at Home: Luminous Pearl Chrome Technique
Unlock the mirror-smooth pearlescent sheen of glazed donut nails with precise flash-cure timing, dust-free prep, and chip-proof chrome edge sealing.